Monday, March 10, 2014

The M7S SMG Project is Underway!

So, Ive been trying to get into the world of prop weapon making too, so I've started with a pretty simple project; the M7S Caseless Sub Machine Gun.

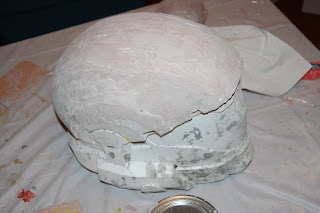
 I've started with a PEP (Pepakura) file of this weapon, but I felt that not only would it take arduous amounts of time to cut out and assemble it, but I wouldn't get the details I want. I ran into this same problem when building my ODST helmet. I asked myself, why cut out these tiny little flaps and try to glue them together when I can go back with clay or Bondo later and get them to my exact specifications. (PS only do it with sculpting clay if you are just going to make a mold; it isn't a material that can be painted/worn around)


I decided to try my own concoction of methods using what I've seen other people do, and what I think will work nicely. Then I took the measurements and sketched them to scale on some 1/8th" foam core board. I cut them out so that I would have multiple of the same so that I could put them side by side. This process is known as "Slicing."
Once cut out I glued them side by side being careful to leave the parts with a function empty.


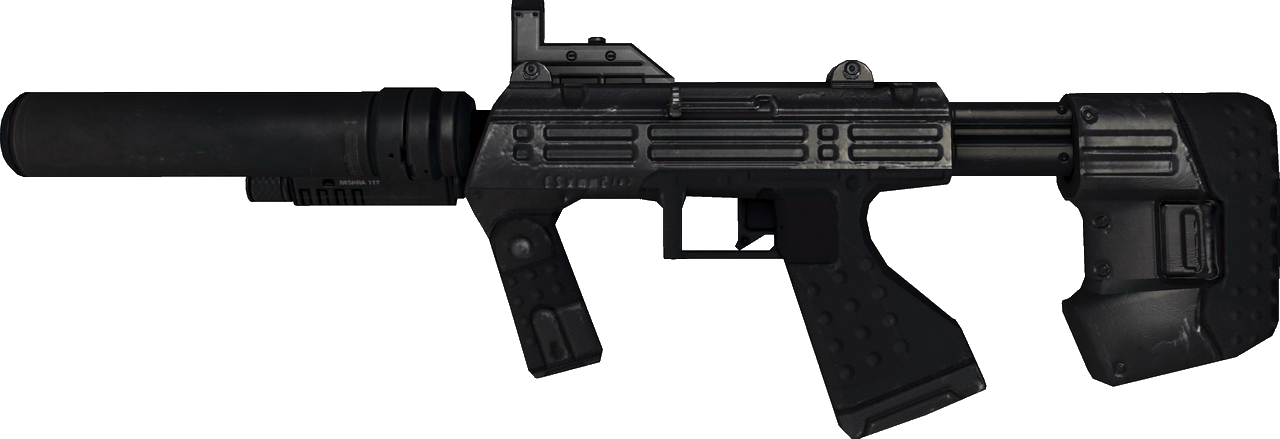
The idea was to make a few pieces that once refined, I could assemble together to have a semi-functioning replica. I fittingly narrowed the M7S down to 7 parts; The sight (to be added later), the left and right sides of the action, the vertical folding fore-grip, the stock, the magazine and the barrel/suppressor/flashlight(to be added later).

The product is an ugly foam ba***rd child of which I will use as a base to build my M7S. I thought it would be fitting to draw some details on just for funzies; buy the next step in this will be to to Bondo some better edges and and sculpting clay to areas where I want more detail. After that I'm going to make a mold of the parts (one time use) in order to make something I can cut/sand into and make some more details. Im going to attach actual Picatinny rails to this model, so that sights can be added. Finally I will add the barrel/suppressor/flashlight out of PVC and make a final casting of which I can produce multiple copies.

If you've got any tips/ideas/comments/questions and/or concerns feel free to comment or drop me a line, and I would be more than happy to respond!

Sunday, March 9, 2014

I'm Back Baby!

That's right folks, HolderBlogger is back and ready to start prop making once again. Where was I? Just taking a sabbatical or leave of absence, but don't pay that no nevermind- for I have returned.

The future line up of projects include REmaking my ODST helmet, Making a few weapons including a BR85 Battle Rifle, an MG6 Magnum, as well as the rest of my armor for my ODST.

Tuesday, May 10, 2011

Bondo Stage

I really don't have alot of bondoing experiance, but in the helmet project I discovered in the process of just painting it on and sanding it off, painting it on and sanding it off painting it on and sanding it off... well, lets just say it gets really repetitive, but just remember this "Yes it maybe more expensive per gallon that gasoline, but you have to pretend you own a HUMMER and go all out." - me. It gets expensive but here are some helpful tips to make it cheaper:

1.) paint it on smooth the first time, and you wont have to do as many coats

2.) stir slowly when mixing the hardener, to keep the bondo from getting bubble in the middle (you'll have to fill them in later if you don't)

3.) the entire helmet doesnt have to be covered in bondo, only the parts that are rough and need to become smooth

4.) youre not making the helmet strong with the bondo, youre just making it smooth, so your finished product should be relatively thin.

5.)when sanding use a coarse sand paper to file down all the crap that you dont want, then use a finer sand paper to make it smooth and exact.

keep that in mind and your bondo experience will be much more pleasant.


Here are some pictures of my process
first patch of BONDO


covered the top


all covered up


all sanded down

Fiber Glassing stage


STEP 3

After your PEP file is cut out and peiced together you begin the fiberglassing stage


I started with your generic run of the mill resin and fiberglas which was just punishing myself, because the resin, if you put too much on at once, would seep through the cardstock and make it soggy. Ergo, you had to do it in patches and it took FOREVER.


About half way through the process i discovered fiberglass jelly (HINT: Fiberglass jelly makes the process take 1/50th of the time of regular resin) and everything went alot smoother because the fiberglass jelly doesnt sink into the paper, allowing you to fiberglass as fast as your hands can work.


Also make sure you use the cloth fiberglas or the matte fiberglas.


Here are some photos of the process, the yellowish brown is the regular resin and the dark green is the Bondo Fiberglas Jelly(life saver).


Sunday, April 24, 2011

Just finished my First Project


I just finished my first project here are some pictures of the process, I am putting subtitles along the way to inform anyone who is unfamiliar with this process.


STEP 1


STEP 2

So for my project i chose the Kirrou ODST HD Rookie helmet, I unfolded it (changed which parts fit together and where, to best suit my needs) and had my local printing store print it out on card stock.


STEP 3


Next, I cut it out and pasted it all together (take my advice and don't try to cut it out and build it in sections, it only ends in disaster). I started with one peice of the helmet and adding the parts around it on to the helmet, until it was complete.


<< thats when I was half way done... kinda looks like a marine helmet...


This was the complete PEP file cut out.